Showing posts with label murrini. Show all posts

Wednesday, February 18, 2015

February Component of the month by Melissa Meman


I am so desperate for winter to be OVER. While snowfall hasn't been as bad for us as last year, I've been cold since October. So when I got Melissa's February component of the month in the mail a few days ago, I immediately thought summer. I got one of these gorgeous carved flowers, but in white copper. I think it could also be a sun, depending on how you choose to look at it.

I've been considering what I want to put with it, and my murrini addiction has been well documented over the last couple years. So I immediately thought about what murrini matches my idea of summer. 

Here's a brand new mix called Pansy Garden from Lori and Kim (my personal drug dealers murrini suppliers).


But I would have to place another order to get this mix (and that would be wonderful tragic). And I just placed an order like a week ago and got these yummy murrini:


and 


Or even use my "go to" favorite mix used in these beads:


Of the 500 murrini mixes I've bought over the last few years, probably half will showcase the type of summer palette I really want. 

I'm also thinking about using some seed beads, which is totally unusual for me. Also maybe some leather. Matching murrini to seeds already in my stash might be the best method so I don't have to order any....

I've also been working on perfecting the lightbulb link from Cindy Wimmer's Missing Link book (which I really love). I'm getting closer, but trying to decide how long I prefer the "bulb" portion of the link. Yeah, I'm being a bit OCD about the whole thing. 


Maybe I'll sprinkle a lightbulb or two into the design as well. I don't know. But I'm super excited to make the beads, finish it up, and WEAR it. I'm hoping it will inspire Mother Nature to hurry spring and summer along.


In the meantime, if you would like to play along with the February component of the month, it looks like Melissa has a few pieces left in her shop

How are you coping with the weather? (Or maybe this is the best time of the year for you?) 

Tuesday, January 6, 2015

A Little Glass Vocabulary Lesson

When I mentioned I was stuck for an idea to write about today, my teammate Lesley Watt mentioned to me that she would like to have a little lesson in some lampwork vocaulary!  Perfect, I said, 'cuz I know that!  So today I'm going to tell you about three lampwork words you may have heard but don't really know what they are - frit, murrini and stringer.

FRIT
The above photo is a picture of frit by Robin Koza of Glass Diversions.  Frit is little ground up pieces of glass that you roll your bead in.  You can either melt it in all the way or leave it somewhat raised for different effects.  There are many producers of frit - Robin's frit blends were the first I was introduced to so I chose to highlight hers here.  But if you google glass frit, you will find many people who make gorgeous frit blends.

Here are some examples of my beads with frit:

 The above is an example of frit, melted in after the base bead was wrapped in silver foil.  You can see the reaction the frit and silver foil give to the beads!
 This is an example of a bead rolled in clear frit, and left somewhat raised.  It gives the impression of sugar or gumdrop candy!
 This is an example of frit over enamel powder (very finely ground glass) - this frit is raku frit, which gives varied colors when worked in different areas of the flame - either hotter or cooler.
 These beads were made by dipping the hot end of a glass rod in frit, then melting in the frit all the the way and making the bead, so it looks like swirls.

 Finally, these beads were made by rolling the disk in frit and only barely melting it in, to make it raised and resemble sand.

MURRINI

Murrini are little chips of glass that you apply to beads.  Murrini can be very simple, or very complex.  Murrini start out by layering colors of glass in specific design patterns to achieve a certain look.  The big blob of glass that results is then pulled down by heating it very slowly and stretching the blob out until it becomes basically the same dimensions as a glass rod.  The rod that results is then cut into "chips" with tile cutters and then applied to beads. 

An example of a simple murrini I made can be seen in this bead:

Here, I striped a rod of ivory glass with red-brown, heated it until the lines were fused with the ivory glass, and pulled it into a rod that I could nip into smaller chips.

Some people make really fantastic murrini - Lori and Kim for example:


Jennifer Cameron uses a lot of murrini by Lori and Kim to make her awesome headpins:

And Donna Millard, who I admire for the videos she shows of her large gathers before she pulls her murrini rods! This murrini by Donna:

 Made these beads:


 STRINGER

And finally, stringer.  Stringer is glass that is pulled off a molten rod of glass to make a thin strand of glass, used in decoration.  I can think of many people who have amazing "stringer control" - which means the ability to control how you apply your stringer onto a bead while controlling the heat used to apply it.  Here are some examples (the stringers are all the little lines you see "drawn" on the design of the bead):

Jelveh Jafarian


 JC Herrell


Holly Cooper


So there you have it, a simple lesson on three lampwork vocabulary words!  I hope you enjoyed the post today, as well as the eye candy!


Susan Kennedy
SueBeads Etsy Store
SueBeads Web Site

Wednesday, March 19, 2014

Quick Stack Disc Stack with Double Ended Lampwork Headpins.

Lately I've been using my murrini headpins as the centerpiece to a stack of enameled discs. I love the vibrant colors and kinetic energy that results from the discs twisting and twirling around.

Working on components for a new line, which is a challenge when the family tries very hard to distract me from getting any work done. I had hoped to have several at the IN art fair this weekend. That's probably not going to happen  #glassaddictions #lampw


Seriously loving this color combo using one of my murrini headpins and a couple of copper discs I enameled. #nofilter #lampwork #glassaddictions #thisartistslife

 The one thing I don't love is using the single wire from the headpin to assemble the stack together AND as the loop for hanging the resulting stack as a pendant or earrings. It was too wobbly for my taste. I mean, I like wobbly for this particular design, but it was just a smidge too wobbly. So I started considering how to get around this issue. That's when I thought about making the headpins double ended.

First, for disclosure, I "thought" of this idea all by myself while brainstorming. But when I actually started creating the headpins, I had a nagging feeling I had heard of something similar before. As I worked, I tried really hard to remember where I had heard of double ended headpins before. And then it hit me after I shut down the kiln for the day. Duh Jenny, it was on your own collaborative blog called Art Jewelry Elements. Written by Melissa Meman. Facepalm. You can click here to read her post on fusing the folded end of the wire into a ball for a double ended headpin. Just make sure you come back to read my post (pretty please?).


Double ended headpins #lampwork #glassaddictions

To start, I knew I couldn't use the typical 18g copper wire I use for headpins. I would have to make the holes in the discs much larger than I wanted to (18g fits tight in the disc holes after they are enameled) and I thought 18g might be too much of a challenge to manipulate for my needs. I decided to try 22g, but I didn't have copper. So I used bronze instead, cutting 4" pieces then making the folded end really tight together.


Double ended headpins on bronze wire. #glassaddictions #lampwork

In Melissa's tutorial, she twisted the two ends together. Because of the way I was making my headpins, I didn't need to do that. I simply added some glass to the folded end.

I selected a couple enameled discs to stack.


Enameled discs. #glassaddictions

And started working.

After stacking the discs, stick both ends of the headpin through and open the ends in opposite directions, making sure to pull snuggly to pick up any slack.


Double ended headpin and enameled discs #glassaddictions  #lampwork

Enameled disc stack and double ended headpin #glassaddictions #lampwork

Then cut the wire you want pointing towards the floor to about 1-1.5" long


Enameled disc stack and double ended lampwork headpin #glassaddictions #lampwork

Start spiraling the cut end and gently (very gently) tap it with a rawhide hammer.

Leave the other end full length (if you don't have a separate hole to hang the assembly from...if you do, cut the other end the same length and spiral in the other direction). Select an area on the wire to make a small wrapped loop. I wanted my wrapped loop to be hidden behind the discs. But this is a personal decision.

Make a small loop, then 2 tight wraps at the base of the loop. I squeezed my loop so that it is a flat loop rather than a round loop.

Enameled disc stack and double ended lampwork headpin #lampwork #glassaddictions


 Spiral the remainder


Enameled disc stack and double ended lampwork headpin #lampwork #glassaddictions

Again, tap with rawhide ever so gently while resting the assembly on something soft, face down.

Repeat as many times as you want until you run out of headpins, discs, or patience

Enameled disc stack and double ended lampwork headpin #lampwork #glassaddictions

Enameled disc stack and double ended lampwork headpin #lampwork #glassaddictions


Enameled disc stack and double ended lampwork headpin #lampwork #glassaddictions

I will be offering some of these double ended headpins in my shop within the next week or two if you're interested in playing with some double ended glass headpins. 

Have a wonderful week!

-Jen Cameron


Wednesday, February 5, 2014

About my not-so-secret addiction: Murrini

I have a problem....an addiction. I'm pretty sure if my family knew the extent of my addiction, they would probably have an intervention. Until they discover my secret, I have no intention of ever giving it up. Because I'm not a quitter.

What am I talking about? Murrini. 

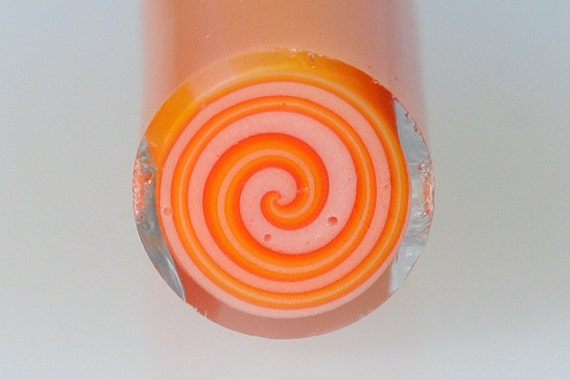
What is murrini? Basically it's a glass cane that can be simple, or very complex pictures in glass. When the cane is cut, the design is revealed. These little slices of glass cane are used in the creation of glass beads, pendants, rings, or even dinnerware. 

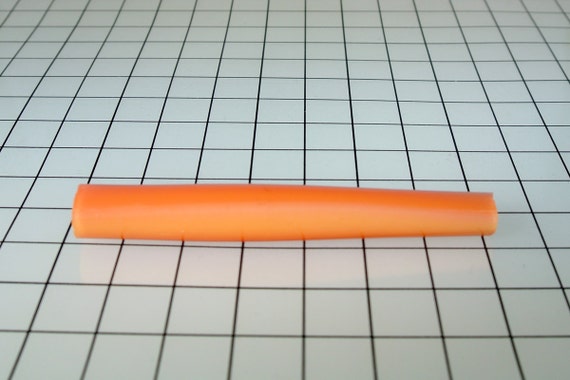
Here's an uncut cane by West County Glass on Etsy


Here's what the design looks like through the entire length of the cane: 


Even if you aren't a glassworker, you can tell that these things would take patience. More patience than I possess. That's why I buy murrini already made and cut up for me so I can make the beads and not mess around with making cane to make beads. 

My current obsession (and one that has been going strong for a while now) is to make headpins with the murrini. Here's a recent batch:


Newest headpins. Really love the pop of bright color during this really cold snowy winter. #lampwork #glassaddictions #thisartistslife

I also used them on the charms I made for the charm swap and Beads of Courage benefit auction:


Jen Cameron 2013 Art Charm

How about using some on a skeleton key? But of course!


Lampworkified key from yesterday's very short torch session. #glassaddictions #lampwork

I thought maybe I would show how I work with these little guys.

First of all, when introduced to an 1800 degree flame, they have a tendency to pop apart. When working with "soft" glass (my glass of choice), it is a little cranky about being cold then put into a flame.

So to start with, I will pre warm them on a candle/mug warmer or even on top of the kiln when it's heated up to the temps (950F) that I garage my beads at before doing the anneal cycle.


Murrini warmer aka candle/mug warmer.

oooh! Look at all the pretty murrini (and no, this is nowhere near how much I really have on hand any given day...).

When I have the base ready to go for a murrini slice, I pick up these angled forceps


Angled forceps

Grab the murrini by the edge (this is kind of tricky). And hold the side I want to put onto the bead above the flame. Even though I've pre warmed the murrini, they will still pop and crack apart. I hate it when that happens. So the intro has to be slow and gentle.


Murrini next to flame

But it's a dance. While I'm getting the murrini warm, I also need to spot heat the base so the glass is sticky and adheres to the murrini slice. If the murrini slice gets too warm while holding it with the forceps, it will stick to the forceps and possibly get distorted (depending on how hot I let it get). If it isn't warm enough, it will crack when put on the base or not stick at all.

One of the skills vital to a lampworker is learning heat control and how to "read" the glass. And just like anything else, it gets easier the more you practice and the more mistakes you make. And trust me, I've made a lot.

These little slices of glass make me so happy. And when I make a bunch of them, it's like a bouquet of tiny round flowers.


Headpins I made a week ago that still need to be pickled. #lampwork #glassaddictions

Glass headpin bouquet #lampwork #glassaddictions

Stay warm, friends!

-Jen Cameron