Friday, May 20, 2016

The Three Muses - a glaze journey...

This is my newest tile design and it tells quite a tale. Pour yourself a cup and I'll tell you... 
And so it begins. 
Here is my new Three Muses tile - the original sketch and the first copy pressed from my mold. It was a long time getting to this state... designing, sculpting, casting in plaster, curing. I was thrilled to have it in my hands. Definitely my most complex tile to date - especially since I do not often do (human) figures. 

I have Lesley and Caroline to thank for the inspiration. In a truly "Scenius" way, a conversation we three had started all this. We were discussing felting, and wool, and curly locks, and gabbing a bit as you do. Someone, Lesley I think, names the thread Three Wise Women. A little cheeky, and a little accurate as we were each other's go-to for feedback and advice. 

I swear this image popped into my head fully formed. 
Please note: thumb for scale! All you are about to see takes place in a tile maybe 6 x 7". 
And then it went further. Three wise women. Three Graces of Classical myth, three Muses. Suddenly Burne-Jones and Rossetti and the Pre-Raphealite painters were there too clamoring for attention. Long Waterhouse style dresses to hide the body (not cheating; just simplifying) and evoke an era of art history? Done. Lets go all the way and inscribe the tile with the motto associated with the Pre-Raphaelite brotherhood! ( In for a penny... ) The motto is "Ars Longa, Vita brevis" which translates to "Art is long, life is short". 

Animal familiars? Three witches? My 2 dogs naturally and Lesley's cat Cleo. A hare for Caroline? Sure! The two of them had recently met up for a hare themed exhibit in the UK and I was desperately jealous. You KNOW how I feel about hares. Oh and should I mention that the hairstyles are loosely inspired by we three? I know - it seems over the top. But it felt right to me. They DO need hairstyles, after all. 

So I recently glazed the first two of these tiles. Why only 2? Well... They are very complex. I wanted to share the process here in a photo essay of sorts. This IS how I glaze all of my ceramic tiles - this one is just many more small parts.. 

1. Stain the entire tile with black (or dark) underglaze. Looks a wreck until you sponge it back. I like the added depth it gives the relief and it prevents any glaring white areas if a spot is accidentally left unglazed. 
Trust is needed here. 
2. Glaze the background ares. I like to work "back to front". This is either underglaze or glaze depending on my planned treatment of the frame. Three coats in and around. 
I think they look good already! SO excited. 
3. Three coats of peachy underglaze on faces and hands. 
Dark dark blue used to stain crevices on this version. 
4. Base color of hair - 3 coats. Sometimes 2 if my underglazes are thick. 
Even working 2 at once there are many variations. Truly one of a kind results. 
5. Accents in hair. Highlights and low lights. 
Aiming for auburn in the middle. We shall see. 
6. First dress: green glaze - 3 coats. 
7. Secong dress - dark blue glaze - 3 coats. 
8. Third dress - turquoise glaze - 3 coats. I selected this analogous palette for the first tile because I knew these glazes and colors worked together, chemically and visually. 
They look so "bleh" at this stage. These are glazes I have used and trusted for 20 years though!
9. Paint the hare and cat in underglazes, with details. ( Sorry Cleo - your marking will have to wait.)
Feeling a little disappointed with detail in these two animals. Then I remind myself they are like the size of a quarter! 
10. Paint the dogs in underglazes. Include shadowing and highlights. Yes, they look like my dogs. What else did you expect? 
OK that was fun! 
Doggy details. Oscar in black and white. Zoey in fawn and brown. 
11. Glaze the background - 3 coats! And edges of tile. In this case I used a transparent grey; since the center area had an underglaze color on it the tile will read ad having a 2 toned background. ( Different tile as can see. I did say I did 2 at a time) AND glaze the center figures sash! 
Yes - different dogs. Simplifying a little and mirroring the cat and rabbit's colors. 
12. Very carefully paint 3 coats of clear glaze to all areas that are underglaze only. This will seal them, give them a gloss finish matching the other glazes and make them durable. 
This is tedious and my least favorite part. 
13. Fire the tile in the kiln. These are low-fired glazes and fire to ^04 at app. 1850 degrees F. 
Ta-Da! And yes - this one already sold. My husband told a return customer this story and it was a done deal! 
I couldn't be happier! I wish I could accurately tell you how LONG it took to do the 2 tiles pictured here in this photo essay. I will keep track next time. I like this palette - I think a tile this "busy" needs harmonious colors to read well without dramatic contrast - so it doesn't compete with itself. I do look forward to trying other palettes on the next few.

Thanks for staying until the end... I am proud of and deeply invested in my work, the details, the layers of meaning that may never be evident to the casual viewer. This new design means quite a bit to me and I am happy to share the backstory with you!

Wednesday, May 18, 2016

Hoards: The Hidden History

I have always loved the idea of buried treasure, The thrill that must go with uncovering something not seen in such a long time, the mystery as to why they were never recovered and of course jewels, antiquities and coins!!!
So when I found out that The British Museum had a exhibition titled - Hoards: the hidden history of ancient Britain, I decided that I really should go especially since it ends in less then a week!

The British Museum
A hoard in its broadest sense is a group of items kept together, and hoards from the past are either deliberately discarded or ultimately lost.

One of the displays I was particularly looking forward to seeing was The Frome hoard, I had come upon an article about the discovery a while ago and was rather excited to get to see it in person....

The Frome Hoard
The Frome Hoard was found in April 2010 by metal detectorist Dave Crisp in Frome, Somerset. The hoard consists of 52,503 Roman bronze and base silver third century coins commonly known as radiates and is the biggest hoard ever discovered in a single vessel in Britain.

Coins From the Frome Hoard
The hoard also boasts the largest group of coins of the British Emperor Carausisus that have been found together and a group of five very rare Carausisus silver denarii (seen above). Oh think of all the things I could do with those lovely coins!

One of the most interesting aspects of the exhibition is the way that they explored the reason behind why the hoards were buried, I had never put much thought into this side of things and had always just assumed things were buried for safe keeping and then lost/forgotten.
It is thought though that due to the location of the Frome Hoard was found, the quantity of low value coins and the fact that the pot was too fragile to be lifted out of the ground once filled with those coins (as well as other reasons) that it may have been a ritual offering made by the community.

Other hoards thought to be ritual offerings from the display include....

Miniature Shields from the Salisbury Hoard
One of the largest hoards of prehistoric metal objects found in Britain, The Salisbury Hoard, near Netherhampton, Wiltshire, was found in the 1980's. The items found were dug up with out the land owners permission or knowledge and sold illegally to a dealer who then sold on many of the items. When it came to light that a large amount of artefacts with out any provenance had come onto the antiques market people started to look for the culprits, four years later they were caught and charged with Theft.

The hoard consisted of over 600 objects, with a mix of Bronze Age metal work and iron age model weapons including 24 miniature shields, 46 model cauldrons (as shown in the photos above and below), 173 socked axes and a variety of tools such as knives, chisels, punches, a hammer and anvil.

Model Cauldrons from the Salisbury Hoard
Then there are founders hoards where the value is in the raw material rather then their face value and the metal for example may have been put aside for recycling.

Vessel from the Water Newton Hoard, Cambridgeshire
The Water Newton hoard found in 1974 contained 30 gold coins dating from AD 337 to 350 inside a leather purse at the bottom of a bronze vessel that was inside a ceramic bowl with weighed amounts of folded up pieces of silver sheet (which were once a bowl and vessel) on top of the purse. The weights of the silver pieces are significant (321g and 642g) weighing one and two Roman pounds in weight.

Purse hoards (accidental losses)

Replica of a money bag
While this Replica (very cool 3D print out) of a money bag from the Beau Street hoard before it was cleaned and separated, is not really a purse hoard (not a small accidental loss as there were 8 bags) it shows what a purse hoard would look like (on a larger scale) if you managed to dig it up intact! Traces of the leather bag that held the coins could be found on the outer most coins as a powder. Then there are Emergency hoards hidden in times of conflict and economic insecurity or spoils of war or proceeds of theft.
Hoard From Near Milton Keynes
This hoard from near Milton Keynes contains the raw materials for forging coins. The three vessels contain bronze pellets, hammered metal discs used to make coin blanks and coin blanks ready for striking with the design, there is also an upper and lower coin die. It is thought that the hoard was hidden to avoid the authorities discovering that the owner of these items was illegally forging coins.

Lastly there are also Grave goods, generally items placed in graves are not considered to be hoards but this tends to be a grey area as human bodies can completely decompose leaving no trace only the items buried with them.

I have always been really inspired by hidden treasures and ancient coins and hope that I will continue to be inspired, here are a few of my designs containing ancient items or inspired by treasure....

Collection of treasure jewellery
Top right 1641 coin with ceramic dagger by P......, top left Treasures necklace with old coin, polymer heart by the fab Rebekah of Tree Wing Studio and lamp work by the wonderful Genea of Genea Beads, bottom right treasure coin locket and bottom left ancient split Djenne Bead set studs.

I do know I could never part with any of my treasured bead hoard, could you?


Monday, May 16, 2016

Rainbow Bead Garden Stake Project!

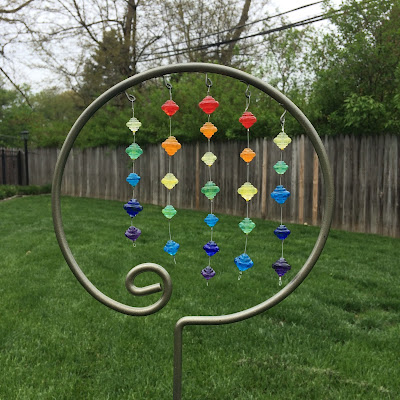
I had this pretty garden stake that used to have beads hanging off of it - over time, the cording they were on broke and the beads were lost.  But I still had this cool garden stake. 

It has five little hooks soldered onto it, and I thought, well, rather than get rid of it, I'll make it a SueBeads project! It was painted that flat black color, so first I painted it with a metallic spray paint. Then, I made a rainbow of baroque beads with gorgeous wispy glass rods from GG Glass.

I had a think about what I would use to hang the beads, and I decided to use beading wire and crimp beads.  So I went about gathering my supplies. I did not use my most expensive cording, nor did I use my most expensive crimp beads, as this will be outside in the weather.

I needed cutters, pliers and a crimper.  I cut five pieces of beading wire, and decided I needed to start at the end of the wire first.  I made the middle string first, as it was going to be the longest. When I put the first bead on the wire, I found that the bead hole (even though I made the bead on a 1/16" mandrel which is a small 1.5mm hole size) was too big.  So I went through my newly acquired seed beads from Bead Fest Spring and picked out some matching colors.

So this is how the first bead that went on looks.  I used matching beads so you wouldn't really see them too much. After that, I had to keep holding the wire up to the garden stake, to make sure all the beads would fit on in a pleasing manner!  I chose the beads in a random size pattern, instead of making them all the same or making them in ascending or descending order. Cuz that's the way I roll.

 This is how the first string looks.  Pretty cute, huh?
Next, I laid out the other sets of beads - not the entire rainbow spectrum of beads would fit on the stake, as it is a circle and gets smaller in length the closer to the outside the strands get, so I decided to do partial rainbows.
And here's the finished project!  It looks really pretty in the sunlight, and should last quite a long time given the beading wire is pretty strong.

I hope this little project gave you some inspiration to use your beads in ways other than jewelry!  Cuz beads belong everywhere, right?

Susan Kennedy


Friday, May 13, 2016

Inspiration at the Zoo

One of my favorite things about living in Nashville is having a zoo membership.  I love to go early in the mornings on Saturday or Sunday and get a good walk in on the paths - the zoo is large enough and hilly enough that I can get a pretty good workout in...if I don't get distracted by all of the inspiring colors, shapes textures and critters around me.  The natural world is far and away the biggest source of inspiration for my beadwork... I know I'm not alone in this!  I hope you will follow along with my creative inspiration tour of the Nashville Zoo!
Foliage and Texture - inspiration abounds in the foliage, landscaping and structures at the zoo.  I have a fascination with beading leaves, and have yet to stumble across a technique that i'm really satisfied with.  Looking at these ferns and hosta leaves is giving me some new ideas!  Check out the texture on that Osage orange...wouldn't that be interesting to recreate?  The net and tree bark are giving me ideas for different bead netting patterns.  And then there's the fact that green is one of my favorite colors to work with...
Flowers - ah, flowers...one of the most prominent sources of natural color palettes, and a lesson in how contrast works.  When you start looking deeper, all of the layers offer up more textural and structural inspiration.  I can't help thinking of short little fringes when I see the stamens on the iris. And those bachelor buttons...can you see them turned into tight spiky bead ruffles?  Hmm, or maybe a doll tutu...
Birds of a Feather - I love birds.  When people describe themselves as cat or dog people, I think of myself as more of a bird person.  Between the colors and variety, eyes, and fantastic brightly colored skin, birds are an endless source of eye candy.  Just look at all the variety of texture on the flamingo, the color combination on the cassowary, and intensity of the hyacinth macaw blue...My fingers are itching to create.
Earthy Animal Colors - Ok, so we all know how much I love color - bright and jewel and contrasting. But when I feel the need to create with a more subdued palette, these are my inspirations.  I find these critters a good reminder that even when the colors are not so saturated there is still contrast to be found.
Reptiles and Amphibians - Snakes, caiman, and tortoises, Oh My!  Reptiles and amphibians have always appealed to me...and I love these pictures for so many reasons.  Again, color and texture abound.  But why not drag out the boxes of animal beads and find a tiny golden frog fetish to incorporate in a project?  Or the malachite crocodile fetish I've been hoarding...maybe it's time to do something with him?  Or maybe that old Galapagos tortoise is telling me it's time to make another turtle totem for my other half...hmmm...
Majestic Koi - The zoo has quite a fun collection of aquatic life in their small indoor aquarium...but I always end up testing out my camera settings to take pictures of the large Koi outside - sometimes it's tricky to choose a setting with a fast enough shutter speed, that will still read the colors and not capture too much glare from the surface.  This trip I tried out the "sunset" setting and I think it might be my favorite!  These fish are so used to being fed that they congregate around if you lean over the barrier blocking the edge of the pond.  This means I can snap a pic from less than a foot away!  Koi can grow to be quite old, and I've been taking pictures of these fish for at least 7 years.  That big speckle white and black with the orange eye spots (bottom left) is my favorite!  And somehow that big orange one (far right) ended up looking like a dragon!  So cool!

Have you been to your local zoo, aquarium, or botanical garden lately?  Tis the season!  Life is bursting outside right now - get out and get inspired!